I had set up a SOA cluster using Enterprise Deployment Guide http://download.oracle.com/docs/cd/E15523_01/core.1111/e12036/toc.htm.
As advised in the guide, we also have an http server proxying the request to one of the 2 SOA Servers in the domain.
Then went up and made appropriate changes in mod_wl_ohs.conf file.
So far so good.Everything now is accessible from the same url.
But when i went on to create an application server connection in jdeveloper either with Admin server port or http port, all it said was.
Testing JSR-160 Runtime ... failed.
Cannot establish connection.
Testing JSR-160 DomainRuntime ... skipped.
Testing JSR-88 ... skipped.
Testing JSR-88-LOCAL ... skipped.
Testing JNDI ... skipped.
Testing JSR-160 Edit ... skipped.
Testing HTTP ... success.
Testing Server MBeans Model ... skipped.
Searched on internet. There was no solution. Every where it said, to remove any proxy in Jdeveloper, or have the same proxy as in browser.Since i was able to connect to admin server using browser.
The resolution is to have the proxy in the browser. Proxy is the http server that you have setup before. After that while creating the connection, create it on Admin Server.
and then
Testing JSR-160 Runtime ... success.
Testing JSR-160 DomainRuntime ... success.
Testing JSR-88 ... success.
Testing JSR-88-LOCAL ... success.
Testing JNDI ... success.
Testing JSR-160 Edit ... success.
Testing HTTP ... success.
Testing Server MBeans Model ... success.
8 of 8 tests successful.
Saturday, April 24, 2010
Thursday, October 8, 2009
Jdev 11g: HumanTask Compliation Issue
If you auto create , Human Task Form using Auto-Generate Task Form jdeveloper automates lot of stuff. A new Project is created with lots of artifacts, and a task form is created too. Jdeveloper even creates a deployment profile.
So you happily, first deploy the Composite, and then deploy the Adf project containing the task form.
But when you are deploying the task form application , a compilation issue comes..
Error(86,53): The function "getResourceValue" for prefix "wf" can not be found in the specified tag library.
Error(90,56): The function "isCustomActionAvailable" for prefix "wf" can not be found in the specified tag library.
Error(96,53): The function "getResourceValue" for prefix "wf" can not be found in the specified tag library.
Error(100,56): The function "isCustomActionAvailable" for prefix "wf" can not be found in the specified tag library.
Solution is to add a jsp tag library. Workflow Tags 1.0

Wednesday, October 7, 2009
Weblogic: Redirecting Console Output to log file
You can redirect wls console output log file, by setting environment variable WLS_REDIRECT_LOG.
For example in Linux before running startWebLogic.sh simply set environment variable like
setenv WLS_REDIRECT_LOG $HOME/WLSLOG.log
Now start web logic server
Before you do this, create a file in home directory as WLSLOG.log and chmod 777 for it.
For example in Linux before running startWebLogic.sh simply set environment variable like
setenv WLS_REDIRECT_LOG $HOME/WLSLOG.log
Now start web logic server
Before you do this, create a file in home directory as WLSLOG.log and chmod 777 for it.
Friday, October 2, 2009
How to view web services in Resource Palette
When you create an Application Server connection in jdeveloper, Only deployed composites are visible.
How do you view the deployed web services?
Jdeveloper has an inbuilt WSIL(Web Services Inspection Language) browser. WSIL is an XML document format which helps in discovery of web services in a standard fashion.
To create a WSIL connection in jdevloper
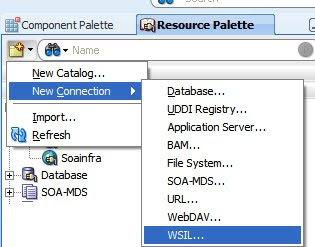
In the connection Wizard, that opens, Give a connection name.Click Next
In WSIL file, give address of the WSIL file, which is exposed automatically by WLS
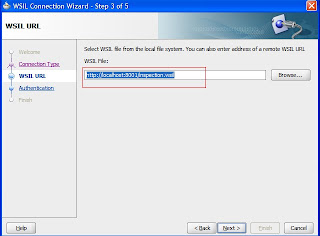 The address usually is http://
localhost:8001/inspection.wsil
Port here is managed server port.
Click next, and give user name and password.Click to finish.
Now expand WSIL in resource palette, and you can view all the deployments on the WLS.
You can also test web services from there, right click and Test Web Service.
How do you view the deployed web services?
Jdeveloper has an inbuilt WSIL(Web Services Inspection Language) browser. WSIL is an XML document format which helps in discovery of web services in a standard fashion.
To create a WSIL connection in jdevloper

In the connection Wizard, that opens, Give a connection name.Click Next
In WSIL file, give address of the WSIL file, which is exposed automatically by WLS
 The address usually is http://
Port here is managed server port.
Click next, and give user name and password.Click to finish.
Now expand WSIL in resource palette, and you can view all the deployments on the WLS.
You can also test web services from there, right click and Test Web Service.
Sunday, September 20, 2009
How to turn on Assertion in jdeveloper
While writing code, we might make certain assumptions.
Say, our govt runs a loan program, where everyone who request for a loan, would at least get something. There would never be a case, when people return empty handed..
public Long fulFillWish() {
/*depending on business rules, give loans..however since this is govt..everyone would get something.*/
if(retunAmt <> Run/Debug/Profile
Edit the default Run Configuration

Tuesday, September 1, 2009
Creating a Web Service From Java Class
The example below makes use of the latest Oracle JDeveloper 11g available for download from here.
Find below the step by step process to create a web service from the java class and how to test it using the integrated weblogic server that comes bundled with the JDeveloper 11g. This approach is also known as Bottom Up approach.
# Open your JDeveloper

# Create a new application and lets name it as MyDateWebService

# Name the project as DateService and shuttle across the Project technologies that we intend to use. Here, I select Web Services. The dependent Java technology gets selected of its own.

# Once Finish button is pressed, the view of the Jdeveloper looks like as depicted below

# Within this newly created project, we create a new java class by doing right click on the project and selecting 'New' - 'New Gallery' window pops open

# Name the java file as 'CurrentDate'

# Modify the newly created java file and add method which needs to be exposed as webservice. Here, I have created getDate() method that returns a string value of the current datetime. Import the needed Date class as shown.

# Now, our class is ready to be exposed as web service. Right click on the java class and in the window that pops open, select 'Create Web Service'

# The Create Web Service process starts. In the step 2, choose Java EE 1.5, with support for JAX-WS Annotations

# In Step3, modify the name of the web service to 'CurrentDateWS'

# Step 5, confirm the methods that need to be exposed as web Service. Press Finish here as we are fine with the default settings in other steps.

# Observe the annotation change in the java class

# Now, our web service is all ready to be tested. Right Click on the java class and choose 'test Web Service'

# This opens the HTTP Analyser window as shown below. Press Send request button.

# As we see here in the window below, the HTTP Analyser presents below the response from the deployed web service.

# Double click on the WSDL URL present in the HTTP Analyser to view the WSDL associated with our web Service as shown below

This ends our simple exercise to create a web service from Java class.
ADF: Transaction Level Validation
In ADF-BC4J, we can declaratively define validations. Validations can be at
1. Attribute Level
2. Entity Level
3. Transaction Level
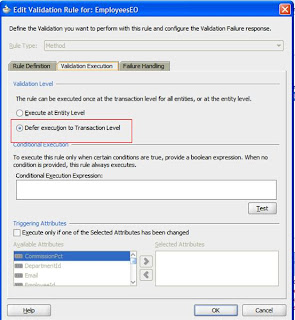
In this post, we are going to see How to execute transaction level validation. As compared to entity level validation,which fires once for each entity, a transaction level validation is fired once for ALL entities.
Lets take a use case.
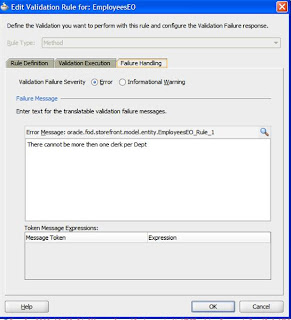
Say my rule is, There should be only one clerk per Dept.
Or
A customer can have multiple Address associated to it. but only one address can be primary address.
Such validation, should be at Transaction Level.
Lets say you are creating employees.
You add a employee "MARK" in dept 90, as "ST_CLERK"
As soon as row looses focus, or you create a new row, Entity level valdiations would fire.
Now add another employee "JOE" in dept 90, as "ST_CLERK", tab out. Again entity level validations would fire.
Now if you commit, Transaction level validation would fire. This gives us a chance to throw an error to user, that You cannot add more then One Clerk in a Dept.
If we had created this validation at Entity level instead, unnecessarily the validation would have fired twice.
Now lets look at the syntax of Transaction Level validation.
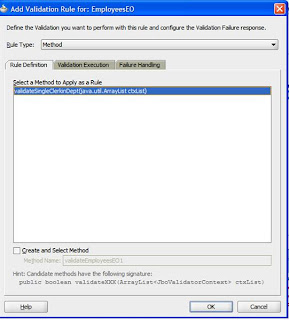
Following code is in EOImpl
public boolean validateSingleClerkinDept(ArrayList ctxList) {
System.out.println("in method validator");
int noOfClerks = 0;
boolean isValid = true;
for (int i = 0; i < ctxList.size(); i ) {
JboValidatorContext ctx = (JboValidatorContext)ctxList.get(i);
EmployeesEOImpl eorow = (EmployeesEOImpl)ctx.getSourceRow();
if(eorow.getJobId().equals("ST_CLERK")){
System.out.println("validating for " eorow.getFirstName());
RowSet rowset = eorow.getEmpVVO1();
ViewObject vo = rowset.getViewObject();
vo.setWhereClause("JOB_Id = :pJobId AND DEPARTMENT_ID = :pDeptId");
vo.defineNamedWhereClauseParam("pJobId", null, null);
vo.defineNamedWhereClauseParam("pDeptId", null, null);
vo.setNamedWhereClauseParam("pJobId", eorow.getJobId());
vo.setNamedWhereClauseParam("pDeptId", eorow.getDepartmentId());
rowset.getViewObject().setQueryMode(ViewObject.QUERY_MODE_SCAN_VIEW_ROWS |
ViewObject.QUERY_MODE_SCAN_DATABASE_TABLES |
ViewObject.QUERY_MODE_SCAN_ENTITY_ROWS);
rowset.executeQuery();
if (rowset.hasNext()) {
noOfClerks ;
}
if(noOfClerks > 1) {
isValid = false;
break;
}
}
}
return isValid;
}
 We are all set with as per as back end is concerned.
Test from AM. Create "Mark " and "JOE" as above, and only when you commit you'll see the error message.
Notice that method validator is only called once, for Both new rows that were created.

1. Attribute Level
2. Entity Level
3. Transaction Level
In this post, we are going to see How to execute transaction level validation. As compared to entity level validation,which fires once for each entity, a transaction level validation is fired once for ALL entities.
Lets take a use case.
Say my rule is, There should be only one clerk per Dept.
Or
A customer can have multiple Address associated to it. but only one address can be primary address.
Such validation, should be at Transaction Level.
Lets say you are creating employees.
You add a employee "MARK" in dept 90, as "ST_CLERK"
As soon as row looses focus, or you create a new row, Entity level valdiations would fire.
Now add another employee "JOE" in dept 90, as "ST_CLERK", tab out. Again entity level validations would fire.
Now if you commit, Transaction level validation would fire. This gives us a chance to throw an error to user, that You cannot add more then One Clerk in a Dept.
If we had created this validation at Entity level instead, unnecessarily the validation would have fired twice.
Now lets look at the syntax of Transaction Level validation.
Following code is in EOImpl
public boolean validateSingleClerkinDept(ArrayList ctxList) {
System.out.println("in method validator");
int noOfClerks = 0;
boolean isValid = true;
for (int i = 0; i < ctxList.size(); i ) {
JboValidatorContext ctx = (JboValidatorContext)ctxList.get(i);
EmployeesEOImpl eorow = (EmployeesEOImpl)ctx.getSourceRow();
if(eorow.getJobId().equals("ST_CLERK")){
System.out.println("validating for " eorow.getFirstName());
RowSet rowset = eorow.getEmpVVO1();
ViewObject vo = rowset.getViewObject();
vo.setWhereClause("JOB_Id = :pJobId AND DEPARTMENT_ID = :pDeptId");
vo.defineNamedWhereClauseParam("pJobId", null, null);
vo.defineNamedWhereClauseParam("pDeptId", null, null);
vo.setNamedWhereClauseParam("pJobId", eorow.getJobId());
vo.setNamedWhereClauseParam("pDeptId", eorow.getDepartmentId());
rowset.getViewObject().setQueryMode(ViewObject.QUERY_MODE_SCAN_VIEW_ROWS |
ViewObject.QUERY_MODE_SCAN_DATABASE_TABLES |
ViewObject.QUERY_MODE_SCAN_ENTITY_ROWS);
rowset.executeQuery();
if (rowset.hasNext()) {
noOfClerks ;
}
if(noOfClerks > 1) {
isValid = false;
break;
}
}
}
return isValid;
}


 We are all set with as per as back end is concerned.
Test from AM. Create "Mark " and "JOE" as above, and only when you commit you'll see the error message.
Notice that method validator is only called once, for Both new rows that were created.

Subscribe to:
Posts (Atom)